Monday, 22 June 2015
M3: Making changes to Website based on Review
I had to add and change the following aspects of my website:

Saturday, 2 May 2015
M2: How a Scripting Language can Improve the Functionality of a Website
Introduction
In this document I will be comparing the server
side and client side scripting that takes place in websites when you're using a
web browser. I will explain the positives and drawbacks of each and what they
are generally used for and their purpose.
Client Side Scripting over Server Side Scripting
Client side scripting is when a scripting language
runs its functionality on the user's PC through their web browser rather than
the server running the website. Server side scripting happens where the website
is hosted directly on the server, the opposite of client side scripting. People
who host web servers tend to run the most demanding scripts on the client’s PC,
this is due to the fact that the client’s PC is a much faster system. Since
servers are designed to just run a huge amount of data on the internet, and if
you’re using a shared server design, running scripts on the user’s PC is a huge
advantage.
Client side and server side scripting have
different scripting environments which they run on, obviously client side
scripting is ran on the web browser itself and works with the HTML code. While
server side scripting is designed to run on a web server environment, and
might even use a whole different scripting language altogether.
Client side has a few advantages over server side
scripting, especially for the goal of making interactive web pages and
interactive gadgets or applets. First the system that client side scripting
will be running on is most of the time going to be a lot faster than the
server. This means any client side scripting will run significantly faster than
server side scripting and allows for fast web page loading. It also means the
interactivity will not be hindered, as for server side scripting, it might
actually slowdown interactive elements of the web page.
Server side scripting is mostly used for
communicating with databases and retrieving information on the user. Things
like e-commerce, social networks, security, privacy and data keeping will be
used for server side scripting, as servers can handle huge amounts of data.
Which is where client side scripting can fall short, but since interactivity
and web page presentation does not depend on huge amounts of data, it does not
need that sort of power.
Client side scripting is a lot more advantageous to
use against server side scripting for interactivity of web pages. Simply due to
the fact that the computer running the said script will be faster, which also
in turn relieves a huge amount of stress on the server side scripting. Which
means it allows for the server side scripting to deal with more specific
situations to do with databases and security.
User Experience and Client Side Scripting
Client side
scripting is a huge advantage for basic user experience and interaction with
the web page, it is extremely useful since it is used mainly for interaction
and the design of the web page. User experience in this day and age depends
heavily on the usage of client side scripting, things like drop-down boxes
would not be even possible without the usage of client side scripting.
Before scripting,
things were extremely basic as web sites only used HTML and CSS, there weren’t
any forms or animations of any sort, nor were there any drop-down boxes. Client
side scripting is extremely important because it saves the user time, and makes
your web page easier to navigate, and provides visual benefits in making your
design more appealing and understandable. For example, imagine a website like
Amazon, without drop-down boxes:

As you can see, I
am hovering my mouse over “Shop by Department” that then shows a drop down box
which contains a comprehensive lists of all the different Amazon shopping
departments I can search in. If there was no client-side scripting, this would
either load extremely slowly, or would not exist at all. Since server side
scripting is so slow, it would be more beneficial to have this has a button
that redirected you to a list of different departments if client side scripting
did not exist.
We take for granted
our experience viewing web pages and how helpful a client side scripting
language like a JavaScript aids in the usability of web pages. It’s not only
drop down boxes this would effect either, if you didn’t have client side
scripting, you would not have animated buttons, lists, effects, etc. When JavaScript
did not take off, a lot of interaction
was based around Flash Player by Adobe, but this wasn’t fast or
efficient in making your website fully animated. It could slow down the whole
website for people who did not have fast PCs to run all of the Flash content,
so when JavaScript and client side scripting became an attractive and useful
tool to take advantage of. Websites restructured themselves according to the
use of client side scripting, and has now allowed all of these increased user
experiences.
Even YouTube used
to use Flash Player, and now uses WEBM files to run animated videos, which
takes advantage of client side scripting. The usage of this has also made it
possible to watch videos in sixty frames per second, and up to 4K resolutions,
making the user experience of watching videos in the world wide web much more
enjoyable and hassle free.
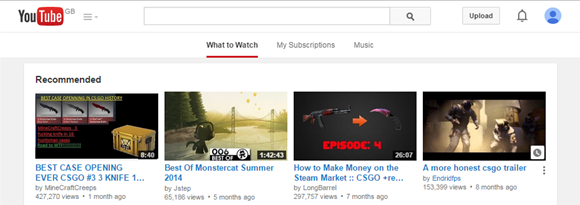

In fact YouTube is
a good example of presenting how client side scripting has aided user
experience and the usability of browsing the web. As you can see in the
navigation bar for watching videos, there are three buttons representing “What
to Watch”, “My Subscriptions” and “Music”. Switching between these is almost
seamless, and it actually loads within the web site itself, rather than your
web browser. Due to pre-loaded client side scripting, if YouTube did not have
client side scripting it probably would not load new pages within itself and
depend much more on the web browser. So like an ordinary website it would
probably redirect you to a different web page stored within a database.
Form Validation and Client Side Scripting
Client side
scripting also forwarded the increase in security on the World Wide Web and has
provided a huge array of benefits for the user. Form validation refers to forms
returning messages based on what the user has inputted into the form’s text
boxes, the form information can even be compared to a database.
However simple
things like checking if a form has actually been filled out or not can be done
on a client side scripting language like JavaScript. A function like this can
be created:
function validateForm() {
var x = document.forms["myForm"]["fname"].value;
if (x == null || x == "") {
alert("Name must be filled out");
return false;
}
}
var x = document.forms["myForm"]["fname"].value;
if (x == null || x == "") {
alert("Name must be filled out");
return false;
}
}
Checking for an
empty form space is a lot faster than checking if the correct information has
been entered because in this function everything is done on the client side.
While correct information has to be compared with a server’s database, or a
database linked to the web server the user is currently using to view the web
site.
Client side
scripting is able improve form validation firstly in the sense that it will
contain the same theme and feel of other client scripting aspects used within
the web page. There will most likely be some aspects that use client side
scripting, and since the form validation will also be using client side
scripting, you can combine these aspects. You could create drop-down select
boxes within the forms, and also make it so it sends and error message if they
chose to ignore the drop-down select box.
Client side
scripting also makes form validation a lot more secure, scripting languages
like JavaScript were designed with security in mind, and it’s extremely
difficult to track information being sent through client side scripting. If you
were to use HTML based form validation, it would be significantly easier for
malicious users to retrieve information if they were to already get past the
first layers of security the website most likely has implemented.
Client side
scripting can also work with server side scripting, which can improve form
validation by a great amount in terms of accurate and valid information. Client
side scripting can work with server side scripting and base information entered
from the client sides form with a server side form, it can also be compared to
the database also. It’s the reason it can sometimes take a long time for you to
log in or to create a new account.
Conclusion:
In conclusion,
client side scripting has improved the user accessibility of the web, and has
enabled people to have a better understanding of the web pages they view. It
has made web pages evolve in the way they look, the way they function and the
way they handle information from a data base. It has also improved the loading
speeds of web pages tremendously over the course of the evolution of client
side scripting. Client side scripting and Server side scripting are both
required for a functioning website, but for interactivity and form validation,
client side scripting is imperative.
Sources:
http://www.w3schools.com/js/js_validation.asp,
02/05/2015, used in page 4 for source code and form validation.
https://www.youtube.com/, 02/05/2015, used
in page 3 for image of the YouTube website.
http://www.amazon.co.uk/ , 02/05/2015, used
in page 2 for image of the Amazon website.
http://www.yourwebskills.com/clientserver.php,
used in page 1 for information gathered.
Friday, 1 May 2015
P3 JavaScript and JQuery
Introduction:
In this document I will be describing the language JavaScript, its purpose, how it functions, why it was created and its implementation with HTML and CSS. I will also describe the complementary library known as JQuery, which is one of the biggest and most used JavaScript libraries.
JavaScript:
JavaScript is a scripting language used for web development and web production, JavaScript was created in order to add interactivity to websites. An example of the interactivity it wanted to achieve are things like drop-down boxes, animated tabs, etc. Things commonly found in software applications like Microsoft Office and the web browser Google Chrome itself. Below is an image of a typical student-based website known as Moodle; which is used for our studies and includes a database of resources and course information. JavaScript allows that drop-down box seen in the image to work, since with CSS this would not be at all possible. JavaScript has now become so well known that almost all websites and browsers use JavaScript to run

Javascript is not a programming language and is not able to do complex algorithms and calculations and is mostly used for displaying interactive shapes and forms. JavaScript has been around for a long time and within that time there has been a lot of libraries created to make coding in JavaScript easier the most famous and most used of which is JQuery.
It is now the most accepted principle that websites should use JavaScript or they are not considered professional in any respect. If web developers want to get work, they will have to implement all three languages (HTML, CSS and JavaScript) in their websites. Javascript was created to standardize web development and to work with web developers to create a globalized standard of how web pages should look and how they should work. It was also advanced in 2005 with the community effort of Jesse James Garrett and others to make it so that data can be loaded in the background, which meant avoiding the need of fill page reloads.
JavaScript is now a global standard, mostly for the usefulness of its joint server-side and client-side possibilities, which can relieve stress off the server and run scripts on the client’s computer. Which intern makes webpages load faster, and webpages a lot more efficient.
JQuery
JQuery is a library of JavaScript code that is used to shorten the amount of time to code in JavaScript. It is literally just a text file filled to the brim with different JavaScript functions and code, instead of typing up the lengthy amount of code to open up a drop down box you can just call a function from JQuery. The reason this was created was to improve web-development times.
<head>
<meta charset="utf-8">
<title>jQuery UI Accordion - Default functionality</title>
<link rel="stylesheet" href="//code.jquery.com/ui/1.11.4/themes/smoothness/jquery-ui.css">
<script src="//code.jquery.com/jquery-1.10.2.js"></script>
<script src="//code.jquery.com/ui/1.11.4/jquery-ui.js"></script>
<link rel="stylesheet" href="/resources/demos/style.css">
<script>
$(function() {
$( "#accordion" ).accordion();
});
</script>
</head>
The code to create this function is worth a few pages and is a lot more difficult to write than to just call the function that is already in the JQuery library. As you can see from the source code below you can save a huge amount of space when using JQuery, and to make your own code a lot neater. It’s also a lot easier and saves a lot of time in development.
var accordion = $.widget( "ui.accordion", {
version: "1.11.4",
options: {
active: 0,
animate: {},
collapsible: false,
event: "click",
header: "> li > :first-child,> :not(li):even",
heightStyle: "auto",
icons: {
activeHeader: "ui-icon-triangle-1-s",
header: "ui-icon-triangle-1-e"
},
// callbacks
activate: null,
beforeActivate: null
},
hideProps: {
borderTopWidth: "hide",
borderBottomWidth: "hide",
paddingTop: "hide",
paddingBottom: "hide",
height: "hide"
},
showProps: {
borderTopWidth: "show",
borderBottomWidth: "show",
paddingTop: "show",
paddingBottom: "show",
height: "show"
},
_create: function() {
var options = this.options;
this.prevShow = this.prevHide = $();
this.element.addClass( "ui-accordion ui-widget ui-helper-reset" )
// ARIA
.attr( "role", "tablist" );
// don't allow collapsible: false and active: false / null
if ( !options.collapsible && (options.active === false || options.active == null) ) {
options.active = 0;
}
this._processPanels();
// handle negative values
if ( options.active < 0 ) {
options.active += this.headers.length;
}
this._refresh();
},
Sources:
https://jqueryui.com, 01/05/2015, used in page 2 for the source code.
https://www.w3.org/community/webed/wiki/A_Short_History_of_JavaScript, 01/05/2015, used in page 1 for describing the reason JavaScript was created.
Sunday, 1 February 2015
Tools used for Web Design (A2 Task 5)
Introduction:
In this blog post I will be describing and explaining the
different tools used for the design of my web page, examples and presentations
of these tools will also be shown. I will be first explaining the usage of QSEE
Superlite and how it takes advantage of hierarchy charts to help design a
website’s most basic layout. The colour palette that my website will use will
also be presented using a programme called Adobe Colour CC, will also explain
the reasoning behind the choice of colour.
Within this post the choice of font will also be explained
and how I will be using the font I have chosen, in this case I will be using
Google fonts for my website. Wireframes shall also be shown and explained how
they help with web design as well as the programme that I used to create my
Wireframes. Lastly I will also explain why it would be useful for web design to
have a graphic programme to use e.g: Paint.NET.
QSEE Superlite:
QSEE Superlite is an old but very useful programme; it
hasn’t been updated in a long time because it doesn’t need to be. As it is
still compatible with current operating systems it’s remained the same for many
years, it’s mainly used by programmers as it allows you to create a different
range of charts easily. The main chart that I am focusing on is the hierarchy
chart, and is great for laying out the website in the simplest format. This
allows you to plan how your website will work and which pages are linked to
each other.

Colour Palette:
The colour palette was an easy choice as I knew my target
audience and subject matter, I decided to use a complementary colour range of
yellows and blues. To help me with my decision I used a programme called Adobe
Color’s Colour wheel which allows you to select one colour and the other colours
are automated. This is dependant on which type of colour theme you have decided
on though.

There will also be a beige sort of colour to be used as the
main background as too many colours could make it seem too childish or too
jarring to look at. I chose complementary colours because it will make the web
page seem well designed and professional and looking at a web page that has
complementary colours is a lot more relaxing and nicer to look at. The hex
codes for the colours have also been displayed at the bottom of each colour,
this will be used in the code for the website and will allow me to replicate
this colour theme.
I believe I might use the dark blue as the text colour
against a very bright background insuring that the text will stand out and will
not be over ridden by a stronger colour. Later down the line I might change one
of the colours to black to compensate for the text colour, this would be done
to make sure people do not get confused when hyper-links are shown.
Fonts:
Fonts is a rather easy one as there is already a nice and
quick way to get fonts that will definitely be viewable by everyone. There are
two cloud fonts that you can use, one by Adobe and one by Google, for this
website I will be using Google as I am more used to its interface and I like
the vast library of fonts it contains. Google fonts allows you to select a
certain font and then put a piece of code into your website to use the font
that is retrieved directly from Google’s servers.
The reason this exists is because designers can run into
problems when some fonts are not compatible with browsers. And since the user
is downloading it from another source on the internet it will always show no
matter what type of browser the user is using.


It’s important to note that depending on what settings are
chosen for your font package it will increase the page load time of the
website. Since its downloading data from Google’s servers before the user goes
into the website, this is the only disadvantage to using cloud fonts for a
replacement of your own fonts on your website. I chose Open Sans since it would
fit in with the fit and feel of the website, I would also make sure to include
a bold version of the font to be used for headings and sub-headings.
Wireframes and Mockflow:
This was the key part of the web design process as it was
the visual layout of the whole website and there is one wireframe representing
each page of the website. The programme that I decided to use was MockFlow as
it is easy to use and you’re able to log in with your Google account which
increases the ease of use. This was done to get a basic idea of the visual
design of the webpage before I start creating it, this is so that I know
exactly what sort of website I want.
Mockflow:
First I want to explain the programme a little bit before I
present the wireframes that will be used to represent the website. Mockflow is
an easy to use tool that can be used to create wireframes, I have used this
mainly because it can connect with a google account and I’m used to its
interface. It does have a premium alternative if you want to pay to get more
features and functions, but for now the free possibilities are enough for me.
This programme does have a learning curve as most wireframe
programmes do, however once you get over it you’ll find the programme to be
very intuitive.
Wireframes:
I have created a number of wireframes that represent each
page that will be featured within the entire website. There are a total of five
pages including the home page that have all been drawn in a wireframe using
Mockflow, I will begin to list these wireframes and explain their design. Note
that some things may change when the design gets implemented.
Page 1 “Home”:

As you can see here this is the home page of my website and
is also the first webpage that will be seen by most users when they try to
visit the website. I gave this a basic layout that allowed for an easy to read
introduction and then two sections to the right for more information about
recent events and/or more information about the website. Since we are looking
at the whole website you may have noticed the top header that includes a space
for the logo that will be included and the navigation menu. These two aspects
and the footer will remain the same for the entire website, thought the
navigation will show what webpage you are currently on. The sub-heading of each
page name will also be placed under the main header to make sure most people can
read and understand where they are.
Page 2 “Why a PC”:

This webpage will be explaining the reasoning behind the
website’s intention which is to convince console gamers interested in PC gaming
to switch. This is a basic format with two rows with a total of 3 possible
images to be displayed to the user. There will also be a heading in the bottom
row to notify the user as to what it is if they choose to continue reading
beyond the first row.
Page 3 “Where to Begin”:

On this page a three-column layout will be used as a way to
make it seem like a leaflet that is ordering the different sub-sections in an
understandable order. Since the reader will be following this as a sort of
tutorial as to find out where they should begin if they want to consider
switching to PC gaming. Up to a total of three images may be used here, but
most likely not, I do not want it using too much space or memory so it’s
dependant on how much is being written.
Page 4 “The Store”:

This page is probably the most important of all five
webpages as this will contain the main part of the JavaScript that I will be
creating. This webpage will be used to display different products that the user
should consider purchasing, there will be an easy to use interface that will
allow the user to scroll between each individual profile of each item and can
identify them via their corresponding picture. The box below this UI will
provide all the information including the item name, price and type, a small
description and thumbnail will be included.
Page 5 “Construction”:

This page will be the concluding point of the website and
will let the user decide on what to do now that they have obtained all this
information. This is also another important webpage as it will be used to make
sure that the user is persuaded to switch to PC gaming over console gaming.
Since this is the finishing point and the user will then leave. However this
webpage will probably contain the most information as I am planning to create
the whole tutorial of building a PC here, there will most likely be more than
two rows and you will be able to scroll through these different sections.
Graphic Programme:
The graphic programme that I will be using mainly will be
Adobe Illustrator, the reason behind using this programme is to create an
eye-catching logo to attract the viewer and make the website seem professional.
Illustrator is a vector-editing image software that is normally used for
creating logos and simplistic art. So this is the main reason I chose to use it
as I required a good quality and original logo.
The programme itself is a bit complicated and has a bit of a
learning curve, but once you get over it you won’t want to use any other
programme ever again. There are a number of tools and functions to use within
the programme and they provide enough depth and functionality to be useful. The logo was created to
represent angelic brightness and sleek practicality into one image. This logo
allows itself to not bash consoles to fiercely and merely defends the concept
of gaming on desktop PCs. The logo was also developed with the complementary
colour them in mind, and matches with the black and yellow that may be on the
website’s colour theme.

Saturday, 10 January 2015
The Purpose of My Website and the Target Audience (Task 1.1 of A3)
Introduction:
In this document I will be explaining the purpose of my website, what it will provide for the targeted audience. I will also explain the reason behind the purpose of my website, why I think it’s suitable for its target audience and why I think it will work for the internet.
The Purpose:
The purpose of my website is to provide information on Personal Computer (PC) hardware, how to replace hardware components such as graphics cards and sound cards and even starting from scratch with a brand new case. I plan to have a basic guide on deciding which pieces of hardware you should buy, a guide on graphics card selection, motherboard selection and case selection. I also plan on providing a top builds page for a budget-buyer, top-tier and the best PC possible to be built.
This website will be done in order to teach the target audience how to build a PC themselves, why they should build a PC themselves, where to buy different hardware and how to select the right components. This will also be slightly gaming orientated, since I will be including information on which graphics cards to select (which are mostly used for gaming). I will also explain the benefits of building a PC yourself over buying a pre-built PC or gaming console. I might also include some news pages based on new hardware components coming out, technologies, etc. But this is only an extension of the website and will only be done if I have
sufficient time.
Target Audience:
The target audience will be a niche of people who build their computers and play on customised PC’s, their age group normally ranges from twenty-one to sixty-five. There are also some younger builders that can range from sixteen to twenty-one, however most of the people that build computers for gaming and other uses are usually found in the higher adult bracket. It will also target people who wish or who already work as an IT technician as this set of skills is required for such a job as well.
It may also target console gamers who want to migrate to PC gaming and learn how to build their own computers. I understand the target audience very well as I am too a part of this group of individuals, I will be able to fulfil the needs of the whole target audience efficiently.
Tuesday, 18 November 2014
Cascading Style Sheets: The Box Model (Unit 20+28, Assignment 2 - Task 4)

The margin is a clear space between the edge of the inside of the browser, sort of like how a word document has a margin between the content and the edge of the paper.
Border:The border is a line that surrounds the padding and content, this is under the margin, the actual webpage begins after this point.
Padding:
This is a clear area that surrounds the content, it's transparent.
Content:
This is where the text, images and interactive content will be displayed.
Reference:
W3 Schools, http://www.w3schools.com/css/css_boxmodel.asp, 18/11/2014
Tuesday, 4 November 2014
CSS Implementation Styles: Advantages and Disadvantages (Task 3)
Introduction:
In
this document I will be explaining the different Cascading Style Sheets (CSS)
Implementation Styles, these are; Inline, embedded and external. I will also
describe the advantages and disadvantages of each implementation style and how
they can be used in certain types of websites and what scenario each style may
be used in.
Inline:
Inline
implementation is applied within the Hyper Text Mark-up Language (HTML) code,
so if you were to type out a HTML tag, you would apply the CSS after you write
out the tag. For example; <body> would become <body style = “color:
purple”> if I wanted all the text within the body tags to be purple. It’s
probably one of the simplest ways of writing up CSS, but it can get
complicated. Inline implementation is more useful for testing certain
circumstances, for example if I wanted to test what a page would look like with
a black and yellow background, I would first test it in the HTML file, to see
if it looks alright. It also takes up less memory than external implementation;
it’s the most light-weight type of CSS implementation.
It could be used for a single webpage, for instance some websites only require one single webpage to establish a point or an idea, and inline implementation would be useful in this sense. The advantages of inline implementation is the fact that it’s easy and straightforward to do, as you can keep coding in the same HTML file that you opened, so it’s quite quick to use in certain situations. It can also be used to make fine details to a certain piece of text, but it’s still not recommended to do so. Again for testing purposes this is great, and outdoes most implementation styles, as you can see how a small bit of text looks in the theme you are trying to create and then decide whether it’s a good idea to implement it across the whole website.
It could be used for a single webpage, for instance some websites only require one single webpage to establish a point or an idea, and inline implementation would be useful in this sense. The advantages of inline implementation is the fact that it’s easy and straightforward to do, as you can keep coding in the same HTML file that you opened, so it’s quite quick to use in certain situations. It can also be used to make fine details to a certain piece of text, but it’s still not recommended to do so. Again for testing purposes this is great, and outdoes most implementation styles, as you can see how a small bit of text looks in the theme you are trying to create and then decide whether it’s a good idea to implement it across the whole website.
However
the main disadvantage of inline implementation is that if you were to create a
big website with multiple webpages, it would get extremely complicated and
cluttered. This means that it’s perfect to be used in quick projects where the
main objective is to test. It’s completely unorganised and you have to keep
retyping it for every new tag you create which can end up becoming tiring. It
is extremely inefficient if you’re even doing a big webpage, let alone a set of
webpages, as you would need to remember what you typed beforehand as well.
Advantages:
-
Quick
to deploy, probably one of the quickest ways to implement your CSS.
-
Small
and concise, uses the least amount of memory.
-
Good
for a programmer to test code, since it’s specific, it also means you can test
a range of formatting to find the one that best suits your website.
Disadvantages:
-
Complicated
if creating multiple webpages, has to be retyped every time.
-
Extremely
complicated if a whole theme needs to be changed, since everything has to be
retyped.
-
Messy
and hard to read, doesn’t look appealing when another individual takes a look
at the code.
-
Can’t
specify a set of tags, has to be retyped for every new tag created.
Embedded:
Embedded
implementation is applied within the <head> tags within the HTML code,
similar to inline implementation. However embedded will have its own
<style> tag to deal with, and will then provide a list of HTML tags and
properties, the properties will be implemented into the tags that are listed. It
appears in a list sort of format and can be helpful for a big webpage, but the
complexity will begin to show when you start adding multiple webpages. So again
the main disadvantage to the embedded implementation will be that it wouldn’t
be suitable with a website with 3 or more webpages involved, since you’d have
to write out the style code each time you create a new webpage. This type of
implementation also takes up less memory than external, and is more
light-weight as it it’s already inside of the HTML file.
However
the main advantage is that it can be used to change a whole webpage that can be
separated from the main website, this also means that if you have a complicated
webpage you want to test and it would become cluttered if you used inline, you
can just use embedded to quickly test the whole thing. You can also copy this
code over to other webpages to test the same thing, since it’s a simple single
tag within the <head> tag. It can also be used for relatively small
websites that only have a few webpages, since it is easy to use and you can
just copy over the code that you placed within the HTML file of the first
webpage that you designed. Anything over a few webpages, like a massive HTML
website project would require a special implementation style known as external.
Advantages:
-
Easy
to code, takes up one section and all the code is placed there in a list sort
of format.
-
Useful
for one-page websites as it applies to a single page.
-
Relatively
easy to make changes.
-
Looks
neater than inline as it has its own section.
Disadvantages:
-
Hard
for multiple page websites as you’d have to retype your section of code for
each page.
-
Can’t
specify as much as inline, so you couldn’t test multiple ranges of formatting
to find the one that bests suits a webpage.
External:
External
implementation is widely used and is the cleanest way of designing a whole
website, the reason for the name is that the CSS code will appear in a file
that is separated from the HTML file. This allows for more flexibility and more
focus for each set of code, since you don’t have to get into the way of the CSS
code when you start coding in HTML. However the two files a linked via a simple
one line tag known as “<link>”, this tag contains three variables; “rel”
which specifies the association between the current file and the linked
external file. Then there’s “type” which describes the type of media of the
linked file, which in this case is “text/css”, after that you’ll have “href”
which is the direct URL which will specify the location of the linked file.
The full tag would look like this:
<link rel="stylesheet" type="text/css" href="theme.css">
this tag would be held within the <head> tag and would link directly to a text file known as “theme.css” which would then contain all the CSS code to be used by the webpage or set of webpages.
This form of implementation would allow a great advantage when developing a large website with a lot of webpages, since you can just set up the webpages to link to one single CSS file. This also means it makes you keep a general theme with your website, which enables it to look clean and user-friendly. Another advantage would be the fact that you can change any part of the CSS file and it would affect all of the webpages linked to it instantly. This makes modifying a website easy and quick, this also allows you to change it according to an event like Christmas and Halloween. It’s also a lot more organised and easier to manage than either embedded or inline since with those types of CSS implementation you have to keep referring to the HTML document. But with external implementation you just have to refer to the file that contains to the CSS and when you have to edit the HTML; you refer to the HTML files. You can also create multiple style sheets to use as several themes for when you explore the whole website.
There are some disadvantages that come with external however; it takes more time to create an external file than to code in CSS within the original HTML file. This means that if you wanted to do some quick testing you would not use external implementation at all, it would be much better to use either inline or embedded depending on the situation. It also technically takes up more memory than a single HTML file, since you are using two files both of which could take up considerable amounts of memory, especially if you were buying a domain name that had a specific limited amount of bandwidth. In this aspect if you have a small budget and bandwidth and only wanted to create a simple website with a few webpages you could use embedded CSS.
The full tag would look like this:
<link rel="stylesheet" type="text/css" href="theme.css">
this tag would be held within the <head> tag and would link directly to a text file known as “theme.css” which would then contain all the CSS code to be used by the webpage or set of webpages.
This form of implementation would allow a great advantage when developing a large website with a lot of webpages, since you can just set up the webpages to link to one single CSS file. This also means it makes you keep a general theme with your website, which enables it to look clean and user-friendly. Another advantage would be the fact that you can change any part of the CSS file and it would affect all of the webpages linked to it instantly. This makes modifying a website easy and quick, this also allows you to change it according to an event like Christmas and Halloween. It’s also a lot more organised and easier to manage than either embedded or inline since with those types of CSS implementation you have to keep referring to the HTML document. But with external implementation you just have to refer to the file that contains to the CSS and when you have to edit the HTML; you refer to the HTML files. You can also create multiple style sheets to use as several themes for when you explore the whole website.
There are some disadvantages that come with external however; it takes more time to create an external file than to code in CSS within the original HTML file. This means that if you wanted to do some quick testing you would not use external implementation at all, it would be much better to use either inline or embedded depending on the situation. It also technically takes up more memory than a single HTML file, since you are using two files both of which could take up considerable amounts of memory, especially if you were buying a domain name that had a specific limited amount of bandwidth. In this aspect if you have a small budget and bandwidth and only wanted to create a simple website with a few webpages you could use embedded CSS.
Advantages:
-
Makes
things a lot tidier as the CSS is separated from the HTML.
-
Allows
one to change a whole set of webpages by changing one CSS sheet.
-
Allows
one to specify individual webpages or sets of webpages by creating multiple CSS
sheets.
-
A
lot easier than all other implementation styles to make big changes to a whole
website.
Disadvantages:
-
Can’t
specify individual tags as well as inline can’t make small changes to different
tags as the CSS within an external sheet applies to all of the tags you set
that CSS to.
-
Uses
up more memory, storage space and bandwidth.
-
Not
useful on a single-page website as it would be a waste of space and time.
-
More
time consuming to code in CSS, not good for testing.
References:
W3Schools,
27/10/14, http://www.w3schools.com/tags/tag_link.asp
Wikipedia, 27/10/14, http://en.wikipedia.org/wiki/Cascading_Style_Sheets
W3Schools, 27/10/14, http://www.w3schools.com/css/
Wikipedia, 27/10/14, http://en.wikipedia.org/wiki/Cascading_Style_Sheets
W3, 27/10/14, http://www.w3.org/Style/CSS/Overview.en.html
HTML Help, 27/10/14, http://www.htmlhelp.com/reference/css/
Wikipedia, 27/10/14, http://en.wikipedia.org/wiki/Cascading_Style_Sheets
W3Schools, 27/10/14, http://www.w3schools.com/css/
Wikipedia, 27/10/14, http://en.wikipedia.org/wiki/Cascading_Style_Sheets
W3, 27/10/14, http://www.w3.org/Style/CSS/Overview.en.html
HTML Help, 27/10/14, http://www.htmlhelp.com/reference/css/
Subscribe to:
Posts (Atom)